Documentation
Welcome to the official Moos.app documentation.
Outline
- Introduction
- General steps
- Definitions
- Panels & screens
- Objects
- Basic actions
- Expressions
- Track behaviors
- Copy & Paste
- Global mode
- Share & Export
- Accessibility
- Account
- Managing costs
- Troubleshooting
Introduction
Quick start
There is also a short visual introduction. It shows up when you run the app for the first time. You can also find it in: Search -> Introduction.
Another way to explore the program is to look for the gold coins. These will tell you little bits of information about how to use the app. If you already found all of them you can bring them back in: Search -> Bring back the coins.
how to use this document
I suggest roughly skimming this document early on in your moos.app journey. After that you can come back to read specific sections when needed. You can search using Ctrl+f in this document.
Where to get help
If this document does not provide enough help paid users can join the forum to get help.
Where to get inspiration
We've got some awesome examples on our home page. You can also open this from the search panel: Search -> examples.
New tab/window
If you want to have the documentation open while using the app you can open the documentation in a new tab/window.
General steps
Building a project in moos.app generally follows the following steps:
- Create new project
- Import SVG created in another application
- Organize the imported objects into groups and name them
- Set the desired track behavior
- Duplicate the current scene
- change some properties (like position) of objects in the scene
- Repeat step 5 & 6 until satisfied
- Click "Publish to public" in the project settings
Definitions
- project manager - The first screen that opens when opening the app.
- Editor - When "editing" or opening a project you land inside the editor.
- Project - You can edit one project at a time inside the editor.
- Side panel - Shown on the left side inside the editor.
- Object panel - Shown on the top section of the side panel.
- Properties panel - Shown on the bottom section of the side panel.
- Object - Each object is shown in the object panel.
- property - Each object contains properties that are specific to that scene at the current time
- Current time - Each scene has its own timeline. If the time is not at 0 it will be shown in either the timeline panel or inside a notification.
- Notification - The little boxes that show up at the bottom of your screen.
- Track - Each Project can contain multiple tracks. A track is a collection of scenes with a track behavior.
- track behavior - Defines how the user will interact with scenes in the track on which the track behavior is defined. For example the presentation behavior will show each scene as a slide and allows clicking to go to the next slide in the presentation. To see a track behavior in action you can open Preview
- Preview - Let's you see and interact with the project to test it out and to see how the final user will see it.
- Keyframe - A property value at a specific time. Keyframes are shown in the timeline panel when an object is selected.
- Timeline panel - Shows the keyframes of the selected objects inside the current scene.
- Switcher - A screen that shows you all scenes and tracks and let's you "switch" between them.
- Quickmenu - A contextual menu that is shown at the top of the editor.
- Search - Lets you search for extra functionality of the app. Most actions are available from here. It is also a great place to find new functionality.
- Project settings - A screen where the general settings of the project can be accessed, like the project name, exporting, etc...
- Selection - Things that can be selected are: objects, properties, keyframes, scenes.
- Camera - The camera is a special object that always exists inside a scene. It is always shown at the top of the object panel. A gray rectangle shows you what is always visible regardless of screen size.
- Scene - A collection of objects with certain properties.
- Viewport - Through the viewport you can see and edit your project. The final user's viewport will always be pointed to the location of the camera.
- Bounds - The boundaries of a visible object. The bounds are shown when an object is selected.
- Group object - A collection of objects that can be moved together.
- Rectangle object - A visible object that can be moved/rotated/scaled and contains other properties such as size, fillColor, strokeColor and strokeWidth.
- Circle object - A visible object that can be moved/rotated/scaled and contains other properties such as fillCOlor, strokeColor, strokeWidth and radius.
- Polyline object - A visible stroked line that can be dashed and trimmed.
- Polygon object - A custom solid shape with one color. These can only be created by importing SVG.
- Export - There are two export options: a standalone HTML file which you can run locally or put on a server yourself, and a .moos-project file which can later be imported again inside the project manager.
- Publish - Makes your project available to everyone that has the link.
- Screen coordinates - The top left of your screen would be (0, 0) and the bottom right would be screenSize.
- Project coordinates - All objects positions are defined in project coordinates.
- Expression - Each object's property contains an expression at a certain time. A simple expression would be "1 + 1".
- Expression type - Each expression has to return a specific type. For example the expression type of the property radius would be "number", the expression type of the property position would be "vector".
- Function - Expressions can contain functions such as min which takes the minimum of several numbers, example: "5 + min(5, 22)" would result in number 10.
- String - A collection of characters. Inside expressions you can define these by putting text between quotes, example: "This is a string".
- Number - A number value, examples: 10, -3, 6.25, 3e4, 3e-4.
- Boolean - A value that can be either true or false. You can see it as a switch that can be on or off.
- Vector - A combination of two numbers that can be defined inside expressions by typing: "(0, 5)". The position and scale properties are examples of properties that have the expression type vector.
- Tulple - A combination of multiple values, example: (10, false, "hello").
- Color - An expression type that is returned by some functions, example: "rgb(100, 0, 100)" returns a color.
- Action - An expression type that is returned by some functions. Many objects contain an "on click" property that gets executed when the user clicks it. Some functions that return an action are: nextScene, setScene(), openLink().
- Array - A collection of values of the same type. Can be defined inside the expression using the brackets, example: "[1,2,3]".
- Coin - A gold dot that can be found inside the app. Clicking on it reveals an explanation.
Panels & screens
Side panel
The side panel shows information about objects inside this scene and is divided in two sections.
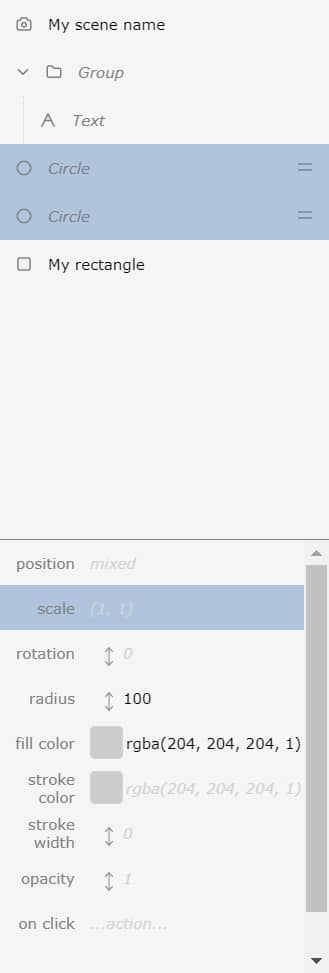
The top section: Object panel
All objects inside the current scene are shown here. Objects that are higher up in the objects panel will overlap objects lower in the panel.
Camera
You can see the first object is called "Camera". This is a special object that is always present and always on top. It determines the location that the user will be looking at when viewing the project. The camera shows the name of the current scene next to it, double click it to change the scene name.
Moving objects
The blue highlighted objects are selected. When an object is selected a hamburger icon appears next to it. If we want to move both of these objects into the group we need to click and drag this hamburger icon towards the other children of the group. A blue line will appear telling us where the objects will land.
Named objects
The object with a rectangle icon is an object named "My rectangle". You can give an object a name by double clicking on it. It is a good practice to name your objects because it will be easier to identify them when they appear in other scenes (The same object can appear in multiple scenes).
The bottom section: Properties panel
Shows the properties of the selected objects. Each object has its own set of properties.
Property names
Appear on the right side. The property name can be clicked to select the property. You can see that the scale property is selected in the image.
Property values
On the right side the property value is shown. These values can appear black in which case they are explicitly set (a keyframe) or gray in which case they are calculated or default values. You can change the value expression by clicking on the property value text, this will open the expression editor.
Calculated values
In the image the radius is shown as "100" explicitly set. What we could do is open the timeline panel and change the current time. This will turn the radius property gray. If only one keyframe has been set the radius will show "100" in gray. If multiple keyframes are set the value will be interpolated. A value of "100" at time 0s and a value of "200" at time 1s will show "150" at time 0.5s.
Default values
When a property has no keyframes it will have a default value shown in gray.
Remove Property value
If a property has a value you want to remove you can select it by clicking on the property name and pressing the "delete" key. The property value will then turn gray.
Mixed
If multiple selected objects contain the same properties but the values are different "Mixed" will be shown. In this image position is an example of that. To set the position of both objects click on "Mixed" Which will open the expression editor.
Color property
The strokeColor and fillColor properties have the expression type color. A rectangle showing the color is shown next to them (transparent and almost white in this case). Click inside this rectangle to open the color picker screen.
Number property
Number properties such as rotation, opacity and radius in this image show an arrow next to them. click and drag this arrow up and down to quickly update a value. Small values will scrub slower then higher values.
Animation with the timeline
To open the timeline press "t". The timeline shows the keyframes of the selected objects. If properties are selected it will only show the keyframes of the selected properties.

Changing time
You can play by clicking the play button or pressing space. Rewind by double pressing space. To move to a specific time click and drag the whole panel left and right. The current time of the scene will be shown in the timeline (0.3s here).
Adding keyframes
When changing properties of objects keyframes will automatically be created. The keyframe will be created under the current time line (shown in gray) in the middle of the image.
Selecting keyframes
Select keyframes by clicking on them, they will then turn blue. You can select all or none keyframes by selecting one and then pressing ctrl+a or ctrl+shift+a respectively.
Moving keyframes
After selecting keyframes a small box with the "<>" icon will appear. Click and drag left or right to move the selected keyframe to another time. Click the icon to deselect all.
Easing
You can see in the image that the selected keyframe has "Linear" easing applied. Click on the "Linear" box to change the easing of the selected keyframes.
Delete keyframes
Delete keyframes by selecting them and pressing delete.
Close timeline panel
Press escape or click the X on the right to close the timeline panel.
Search
The search screen lets you quickly find functionality and documentation. Most functionality available can be executed from here.
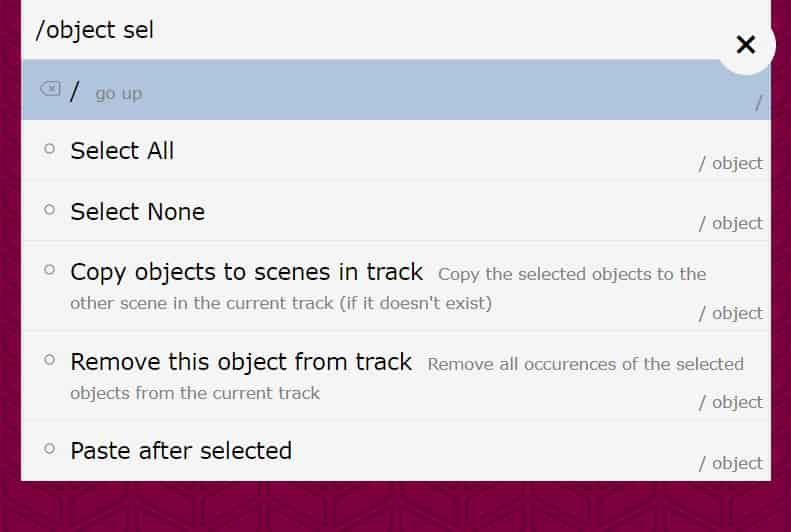
Navigation
Navigate by using the arrow keys or by typing into the search bar. The highlighted (in blue) item will be executed when pressing enter or clicked.
Directories
In the image you can see that the user is currently searching for "sel" in the "/objects" directory. The search phrase will be searched in titles and descriptions.
Project settings
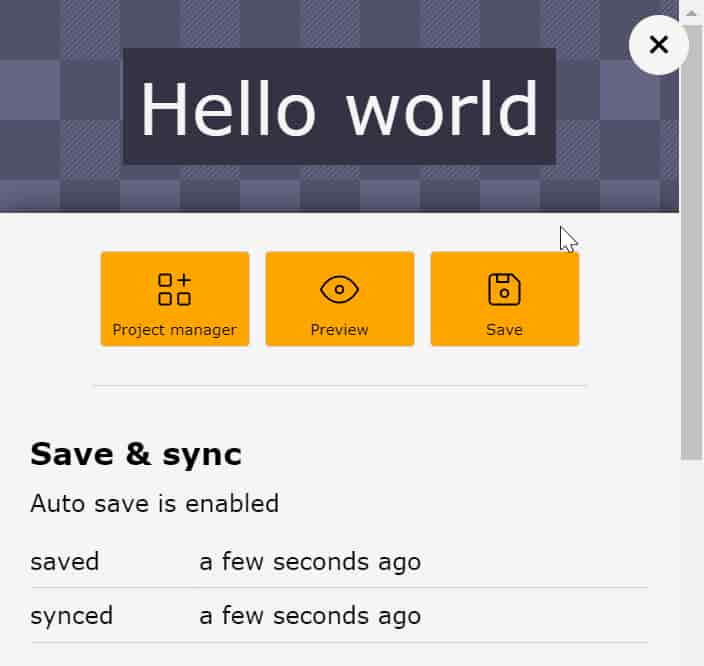
Project name
You can change the name of the project by clicking on it. In this image the name of the project is "Hello world".
Other stuff
Save & sync times, publish project, project stats, export project, delete project.
Switcher
Allows you to see all scenes in the project and switch between them.
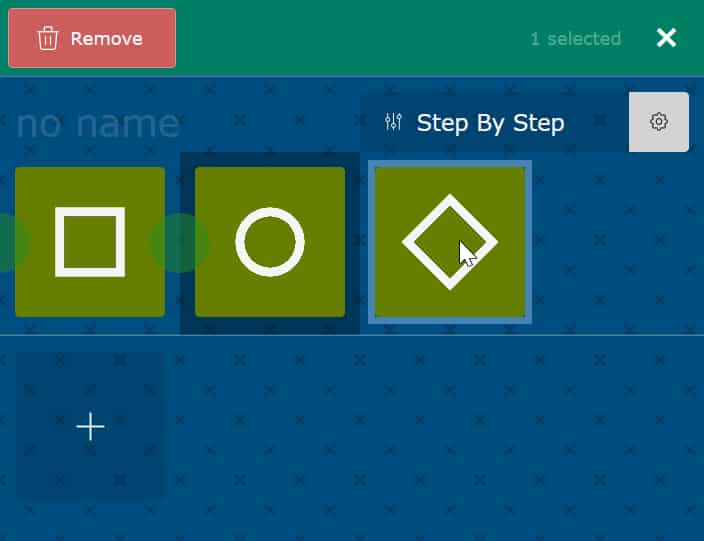
Track behavior
All scenes that are contained inside a track are shown horizontally. Each track has a "track behavior" applied. In the image above it is "Step by Step". Click On it to choose another one. Click on the gear to change settings specific to this track behavior.
Add track
The plus button at the button can be used to create a new track with one scene. Tracks always need at least one scene.
Select scenes
A button (not shown in the image) at the top allows you to select scenes. In the image we have clicked that button and a green bar appeared. Now we can Select scenes.
Reorder scenes
In the image you can see green circles between the scenes. These become visible when you select scenes. Clicking on them will move the scenes to the position of the circle you clicked.
Remove scenes
Select scenes and click delete at the top to delete the selected scenes.
Expression editor
Click a property value to open the expression editor. You can input values at the top. The expression editor will tell you if the values you put in make sense. It also shows documentation.
Color picker
Allows selecting a color using several methods. The old color is shown on the left and the new color is shown on the right. Choose a color by pressing enter or clicking the cross in the top right.
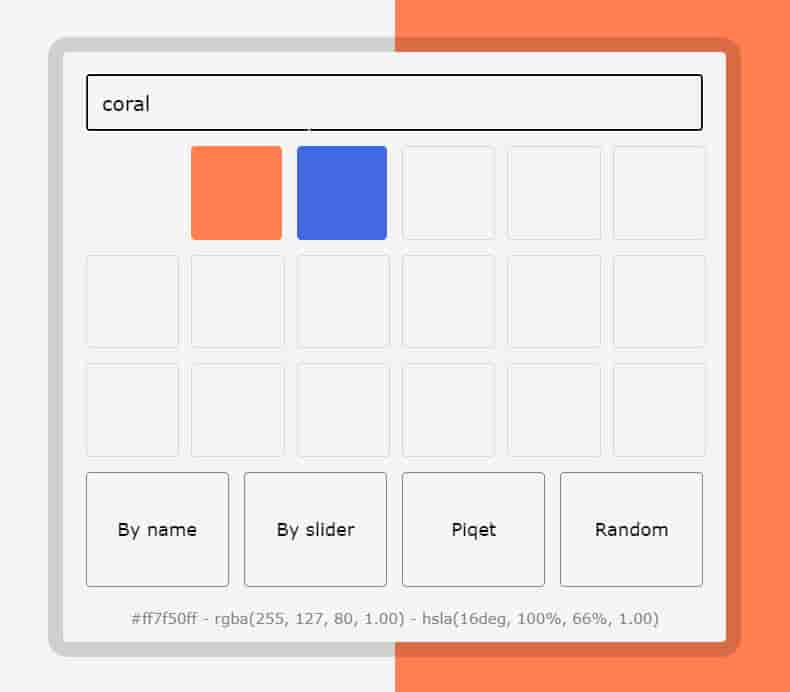
Text input
examples of possible values: royalblue, #eee, #2d44a6, rgb(100, 30, 255), hsl(150, 50, 30)
Presets
Click an empty box to add a color to it. Long click to remove it. Click a box with a color in it to select it.
By name
Pick a color among the list of standard HTML color names.
By slider
Pick a color by sliding Hue, Saturation and Lightness (HSL) sliders.
Piquet
Pick a color from the viewport. Click the color you want to select and then the box in the bottom to select it.
Random
A random opaque color
Objects
Camera
A special object that is always present in a scene. This object will determine what the user will look at. Changing the name of this object also changes the name of the current scene.
- position - The position of the camera
- rotation - The rotation of the camera
- zoom - The amount of units the camera can see. Higher is more zoomed out.
- background - Choose a color as the background of the scene.
- subtitles - Add subtitles to the scene by setting this to a string.
Rectangle
A regular rectangle with fill and stroke.
- position - the position of the rectangle
- scale - the scale of the rectangle
- rotation - the rotation of the rectangle
- size - w x h
- fill color - fill color
- stroke color - stroke color
- stroke width - The stroke is aligned on the edge of the rectangle.
- opacity - value between 0 - 1
- on click - The action to be executed when the object is clicked by the user.
Circle
A regular circle with fill and stroke.
- position - the position of the circle
- scale - the scale of the circle
- rotation - the rotation of the circle
- radius - value must be 0 or higher
- fill color - fill color
- stroke color - stroke color
- stroke width - The stroke is aligned on the edge of the circle.
- opacity - value between 0 - 1
- on click - The action to be executed when the object is clicked by the user.
Polyline
A line that can be dashed and trimmed.
- position - the position of the polyline
- scale - the scale of the polyline
- rotation - the rotation of the polyline
- stroke color - stroke color
- stroke width - Must be 0 or higher
- stroke offset - Where the stroke should start
- stroke length - If not set the length of the line is used
- dash length - 20 by default
- dash gap - 0 by default, increase for a dashed line
- dash offset - where the dash should start
- opacity - value between 0 - 1
- on click - The action to be executed when the object is clicked by the user.
Polygon
A polygon with a single fill color. This object can only be obtained by importing a SVG with a filled path.
- position - the position of the polygon
- scale - the scale of the polygon
- rotation - the rotation of the polygon
- fill color - fill color
- opacity - value between 0 - 1
- on click - The action to be executed when the object is clicked by the user.
Image
An image object can be created by dropping a JPG or PNG image inside the editor.
- position - the position of the image
- scale - the scale of the image
- rotation - the rotation of the image
- opacity - value between 0 - 1
- on click - The action to be executed when the object is clicked by the user.
Group
A collection of objects.
- position - the position of the group
- scale - the scale of the group
- rotation - the rotation of the group
- opacity - value between 0 - 1
- on click - The action to be executed when the object is clicked by the user.
Basic actions
Selection button
Hold the shift key, a rectangle on the right side of the screen will appear. This is the selection button, press it when you want to select something.
Select Top
Press shift and click on an object to select it. Click again to deselect that object. When there is another object under the selected object clicking again will select that object instead. Clicking on a selected group will select an object inside that group.
Box select
Hold shift and drag over the viewport, a blue rectangle will appear. All objects inside the blue rectangle will be selected
Select from object panel
Click on objects in the object panel to select them.
Select all
when pressing ctrl+a all objects will be selected. If there were already objects selected only neighbors will be selected. If all neighbors were already selected all children (if there are any) will be selected.
Deselect all
You can deselect all by pressing ctrl+shift+a
Move
Select one or multiple objects, then click and drag inside a selection rectangle to move the selected objects. Objects will snap to the edges of other objects in the viewport. Objects will not snap to objects that are outside the viewport. Alternatively you can click the position property in the properties panel which will open the expression editor. There you can set the position manually.
Rotate
Select one or multiple objects, then click and hold outside the selection rectangle. A circle will appear. If you drag along this circle all selected objects will be rotated. You can also click the rotation property inside the properties panel and set the rotation of the selected objects manually.
Scale
Select one or multiple objects, then click and hold outside the selection rectangle. A circle will appear. Drag towards the center of this circle to scale all selected objects down. Drag outwards to scale up. You can also click the scale property in the properties panel to set the scale manually.
Reorder
If you want one object to appear on top of another object select it in the side panel. A hamburger icon will appear. By dragging the icon up a blue line appears which indicates where the object will land. Higher objects in the side panel will overlap objects that are lower in the list.
Reorder after group
If you want to place an object after a group move your pointer to the left side of the side panel. the blue line that indicates where the object will land will move left. If you want to place an object at the end of a groups children list move your pointer to the right, the blue line will indent to the indentation of the group.
Delete
Select one or multiple objects and press delete. You can also press the remove button in the quickMenu.
Expressions
Most of the time you want properties to be simple values. You draw a circle and its position and radius properties will be set. But sometimes you want to do more complicated stuff. Maybe you want an object fixed on screen instead of moving with the camera. Maybe you want an object to rotate over time. Maybe you want to control a value by having it set by the page the project is embedded on. For these things you need to use expressions.
Examples of expressions
To get a better feel for what expressions look like here are some examples:
- 1 + 1
- 1 + -1
- (1 + 2) * 3
- (1, 5) + 6
- (1, 5) * 6
- (1, 5) / (10, 10)
- length("some test") == 9
- 10 > 5
- 5 > 10
- "string"
- 123
- clamp(5, 10, 15)
- lerp(5, 15, 0.5)
- lerp((0, 0), (10, 10), 0.5)
- min(12, 43, 5, 7357)
- max(1, 3, 10, 4) + 2
- first((10, 20))
- second((10, 20))
- length((3, 4))
- if(true, "a", "b")
- if(false, "a", "b")
- if(true, false, true)
- !true == false
- not(false)
- string(true)
- string("test")
- string(123)
- string((1 + 2, 3))
- rgba(0, 0, 0, 0)
- rgba(255, 255, 255, 1) == rgba(255, 255, 255, 1)
- lerp(rgba(0, 0, 0, 0), rgba(255, 255, 255, 1), 0.5)
- floor(0.3)
- ceil(4.7)
- milliseconds(1611938279085)
- seconds(1611938279085)
- minutes(1611938279085)
- hours(1611938279085)
- days(1611938279085)
- months(1611938279085)
- years(1611938279085)
- screen(screenSize / 2)
- openLink("moos.app")
- openLinkNewTab("moos.app")
- externalValue("valueName")
Expression syntax
As you can see expressions look a bit like mathematical expressions, they contain numbers, variables and functions. One difference is that expressions can contain different "types" than just numbers.
| Syntax | Description |
|---|---|
| -123.20e-5 | A number: Optional minus sign (-) + some digits + optional (.) and digits + optional scientific notation (e) (-) some digits. |
| Infinity | A number written as literal "Infinity" (Capital I) |
| 1 + 2 * 3 | Operators like + and * can exist between values. Normal precedence rules apply, this expression returns 7. Valid operators: + - * / % ^ > < >= <= != == |
| (1 + 2) * 3 | Groups change the precedence of an expression. A group is a sub expression surrounded by parenthesis. This expression returns 9 |
| !(1 > 2) | The not operator "!" followed by a sub expression (no whitespace in between). The sub expression should return a boolean |
| "Hello world" | Strings are text with quotes around it. Use a backslash to write a literal double quote (\") |
| (5, -6) | Vectors are written as two numbers with parenthesis around it and separated by a comma |
| true | Booleans are written as literal "true" and "false" |
| pi | Variables contain a value just like x in a mathematical expression |
| max(3, 4) | Functions start with an identifier and then the arguments separated by commas and surrounded by parenthesis. There should be no whitespace between the identifier and the parenthesis |
Types
You can think of types like a unit of measurement. If we got a basket with 2 apples and a basket with 4 apples we can put them together which makes 6 apples. On the other hand if we got 3 oranges and 2 apples we cannot put them together because 5 appanges is not a thing. You can think of apples as a type. Our expression language does not have apples or oranges but it has some other types, some of which you'll be familiar with and some that might be new to you.
Number
This is probably the most well known type. Numbers use a dot (.) for decimals. You can also use scientific notation (1e10). Here are some examples:
- 123
- 45.32
- -23.4353
- 4.3e5
- 6e-3
- Infinity
- -Infinity
Here are some examples of expressions with numbers:
| Expression | Result |
|---|---|
| 1 + 1 | 2 |
| 1 + 2 * 3 | 7 |
| (1 + 2) * 3 | 9 |
| floor(45.12) | 45 |
| ceil(45.12) | 46 |
| round(45.12) | 45 |
| 5 * (2, 3) | (10, 15) |
| 9 % 3 | 0 |
| if(true, 2, 3) | 2 |
| if(false, 2, 3) | 3 |
| lerp(10, 20, 0.5) | 15 |
| max(1,2,3,4) | 4 |
| 5 > 10 | false |
| 10 >= 10 | true |
| 1 != 2 | true |
| time | 3000 |
| pi | 3.141592653589793 |
| if(min(10, -5, 3) >= 3 * -1, 2, 3) | 3 |
Vector
A vector consists of two numbers and is used for things like position. For position the first component of the vector is the x position, and the second component acts as the y position. It is useful to use vectors for this because often you want to do calculations on the position as a whole and not necessarily on the individual components. Vectors support many of the regular operators such as addition (+), which makes them easy to work with. Here are some expressions using vectors:
| Expression | Result |
|---|---|
| (3, 4) | (3, 4) |
| (3, 4) + (5, 6) | (8, 10) |
| (3, 4) * (5, 6) | (15, 24) |
| (3, 4) / 2 | (1.5, 2) |
| 10 * (3, 4) | (30, 40) |
| first((3, 4)) | 3 |
| second((3, 4)) | 4 |
| if(true, (4, 4), (5, 5)) | (4, 4) |
| (5, 5) == (5, 5) | true |
| mouse | (234, 167) |
| screenSize | (1200, 960) |
Color
A couple of properties require a color type, such as the property fill color used by rectangle and circle objects. There is no syntax for colors like with numbers (where you input digits to create a number) or like vectors (where you put numbers between parenthesis), colors can only be obtained by getting the result of a function. Colors do not support most of the basic operators, what would blue / 2 even mean? Here are some expressions which use colors:
| Expression | Result |
|---|---|
| rgb(255, 255, 255) | rgba(255, 255, 255, 1) |
| rgb(first(mouse), 0, 0) | rgba(103, 0, 0, 1) |
| rgba(50, 0, 122, 0.5) | rgba(50, 0, 122, 0.5) |
| lerp(rgb(255, 0, 0), rgb(0, 255, 0), 0.5) | rgba(128, 128, 0, 1) |
String
A collection of characters in between quotes. An example of a property that needs a string is the subtitles property of the camera object. It shows the resulting string to the user as a subtitle. Strings support some operators like addition (+) but not subtraction (-). If you want to use a double quote character inside a string you need to put a backslash (\) before it or use single quotes., otherwise it would be interpreted as the end of a string. Here are some examples:
| Expression | Result |
|---|---|
| "Hello World" | "Hello World" |
| "So I said 'Hello'" | "So I said 'Hello'" |
| "So I said \"Hello\"" | "So I said "Hello"" |
| "The number is " + 5 | "The number is 5" |
| length("coconut") | 7 |
| "sheep" != "cow" | true |
| if(true, "yes", "no") | "yes" |
| openLinkNewTab("https://moos.app.app") | action... |
Boolean
Where a number has infinite possible values a boolean has only two, true and false. This makes them great to use as a switch. Look at the examples:
| Expression | Result |
|---|---|
| true | true |
| false | false |
| !true | false |
| !false | true |
| 4 != 10 | true |
| if(true, 1, 2) | 1 |
Action
an action represents something that can be "run" or "executed". The best example of this is the "on click" property that many objects contain. We want to specify what needs to happen when the object get's clicked. To do that we give it an expression that returns an action which is executed as soon as the object get's clicked. Here are some examples:
| Expression | Result |
|---|---|
| nextScene | action... |
| prevScene | action... |
| setScene(scene.someSceneName) | action... |
| openLink("wikipedia.org") | action... |
| openLinkNewTab("wikipedia.org") | action... |
Scene
You can refer to a scene by typing "scene." and then the scene name. Only scenes with names can be accessed this way. This type can only be used with one function "setScene(scene.someSceneName)" which returns an action which transitions into the specified scene when the action is executed. This can be useful if you want to make a button which brings the user to another scene.
Common expressions
Here are some common expressions and their explanations:
| setScene(scene.someSceneName) | Returns an action that transitions the user to the scene named "someSceneName" when executed. |
| OpenLink("wikipedia.org") | Navigate the page to https://wikipedia.org when the action is executed. |
| screen((0, 0)) | Get the project coordinates at the top left of the screen. If you set this as an expression for a position property the object will stay at the top left of the screen even when the camera moves. |
| screen(screenSize / 2) | Same as above but use the middle of the screen instead of the top left. |
| time / 100 | Resulting value is increased with 10 each second. If used with rotation the object will rotate 10 degrees per second. |
| sin(time / 1000) * 5 | Returns a number that alternates slowly between 5 and -5 over time. |
Track behaviors
Imagine a presentation, on each click you advance to the next slide. That is a case where we use scenes, place them in order, add navigation, add shortcuts and add visual cues about the progress. This is what we call the "Presentation" behavior. The other behaviors stitch scenes together in different ways to lead to a different experience for the user. To really get a feel for what these behaviors do it's best to just try them out.
Standalone
Each scene in a track with a "Standalone" behavior stands on its own. You could use this to show an animation with which the user cannot interact.
Presentation
Start with the first scene and transition to the next when the user clicks the right side of the screen. Clicking the left side transitions to the previous scene. The user can also use the arrow keys to navigate between the scenes.
Area
For this behavior you need to place the camera of each scene into a different position. The user will start at the first scene and will be able to "drag" itself in the direction of another scene. When the user releases it's pointer the viewport will transition to the camera position that is closest at that point.
Step By Step
The user is presented with a scrollable text area (location depending on screen size) and a different scene is shown depending on which text section the user is looking at. To insert the text go into track settings and click "scene" to add a divider. All text before the first divider is matched to the first scene, text before the second divider is matched to the second scene and so on.
Article
The user can scroll through an article consisting of several sections. Between each of those sections a scene is shown. To insert the text go into track settings and click "scene" to add a divider. All text before the first divider is matched to the first scene, text before the second divider is matched to the second scene and so on.
Map
For this behavior you need to place the camera of each scene into a different position. The user starts on the first scene and is able to pan and zoom around the map. It can use the mouse, one/two fingers or shortcuts to do that. If the viewport gets close to the camera position of another scene it will transition into that scene, the viewport position will not change.
Perspective
By hovering with the mouse or by rotating your phone this behavior will interpolate between the first and the second scene. You can use this for interesting depth effects or subtle animation. Scenes after the second are not used.
Vertical scroll
All scenes are stacked onto each other. The user can scroll from the first scene down to the last scene while the scenes are smoothly transitioned. The transitioning is linked to the scroll bar.
Horizontal scroll
The user starts on the first scene and can scroll horizontally to the next one while the transition is linked to the scroll position. The user can also use arrow keys or "grab" the screen to scroll.
Scroller
This behavior is perfect for product pages. The user scrolls through a text which blends in with the page. The transitions between scenes are driven by the scroll position.
External
Embed this track behavior into an iframe on your website and drive it using the following javascript code:
const iframe = document.querySelector('iframe')
iframe.contentWindow.postMessage({moosExternalProgress: 0.56}, '*')
"moosExternalProgress" must be a value between 0 and 1 where 0 will show the first scene and 1 the last.
To test this behavior you can change the track behavior to Vertical Scroll and check how that feels.
On the homepage the following piece of code is used to embed a project inside a website
<style>
	main {
		height: 600vh; /* How long you want to scroll */
		position: relative; /* iframe.offsetTop relative to this container */
	}
	main iframe {
		position: sticky;
		top: 0;
		left: 0;
		width: 100%;
		height: 100vh;
		border: 0;
	}
</style>

<main>
	<iframe src="project.html"></iframe>
</main>

<script>
	const iframe = document.querySelector('iframe')
	document.addEventListener('scroll', () => {
		const {y, height} = iframe.getBoundingClientRect()

		// Only update when the iframe is visible
		if(y < 0 || y > height) return

		// calculate progress
		const mainHeight = document.querySelector('main').offsetHeight
		const p = iframe.offsetTop / (mainHeight - height)

		// send progress to iframe
		iframe.contentWindow.postMessage({moosExternalProgress: p}, '*')
	})
</script>
Copy & Paste
In the application ctrl+c and ctrl+v can be used for copy and paste. There are multiple things you can copy that seem similar but work in a slightly different way. There are three things that can be selected and copied which are:
- Objects
- Properties
- Keyframes
Properties and keyframes can only be selected if objects are selected. If you selected properties and/or keyframes one of the following will happen:
| What is selected | What happens |
|---|---|
| 0 properties, 0 keyframes | Unique objects with their properties are copied at the current time. You can use this to copy specific objects to another scene. You can also copy the exact state of an object and its properties at one time to another. |
| 0 properties, 1+ keyframes | All selected keyframes are copied for the unique objects. Use this to copy all or some keyframes from one scene to the same object in another scene. |
| 1+ properties, 0 keyframes | Selected properties are copied at the current time. Use this to copy a property from one object at a specific time to another object which has the same property. You could for example copy the position of one object at time 1.3s to the position property of another object at time 2s. |
| 1+ properties, 1+ keyframes | The selected keyframes of the selected properties are copied. Use this to copy the selected keyframes of one property to the same property of another object. You could for example copy the rotation animation (which exists of several keyframes) to another object that also has a rotation property. |
Select all objects
To select all objects, first select none (ctrl+shift+a one or two times) and then select all (ctrl+a). Pressing all when objects are selected will result in selecting the neighbor objects, or if neighbor objects are already selected children will be selected.
Select all properties / keyframes
Select one property/keyframe and then do a select all (ctrl+a).
Select none
Pressing "select none" will first deselect all properties and keyframes. If those are already deselected "select none" will deselect all objects.
Limited paste
The paste will only affect selected items. If you copy position and rotation properties and then paste when only position is selected only position will be pasted. If no properties are selected on paste both position and rotation would be written. The same is true for pasting keyframes.
Duplicating objects
In most design programs you can copy + paste to duplicate an object. In this application this would just overwrite the same object. To duplicate use the dedicated duplicate action (ctrl+d).
Global mode
When activated many actions apply to all scenes instead of just the one now shown. When removing an object when global mode is on the object will be removed from the whole project. If you move an object the position of the object will be updated in all other scenes as well (if that object exists in a scene).
What often happens is that you've got an object that exists in several scenes with different positions in each scene. Say you want to change the color of this object, it would be cumbersome to go over each scene and change the object color. What you can do instead is activate global mode and change the color of the object once.
Share & Export
There are a couple of ways to share projects with other people.
Publish
In the project settings you can click "Publish to public", this will create a link for you. Anybody with that link can view the project.
Export standalone html file
The app allows exporting a standalone html file. Opening this html file will show you the project. You could also place it on a server for others to access.
Export .moos-project file
If you want to preserve a copy of a project or you want other moos.app users to edit a copy of your project you can export a .moos-project file. You or someone else can import this file in the project manager.
Embedding a project as an iframe
When a project is embedded as an iframe you can send it values. To do that edit some properties so they contain the following expression:
externalValue("numberValue")
Then on the page that contains the iframe add some Javascript:
const iframe = document.querySelector('iframe')
iframe.contentWindow.postMessage({numberValue: 123}, '*')
The value returned by the externalValue function will return 123 in this case.
Accessibility
This application implements features that make it easier for people with some disabilities to view your project.
Reduced motion
Some people experience motion sickness or prefer reduced motion in general. These people can enable "reduce motion" settings in their os. Moos.app respects this setting automatically, no action is needed on your part.
Reduced vision
People that have reduced eyesight often use screen readers to read the page. To help these people consider doing the following:
- Give each scene a descriptive name.
- Add descriptive names to objects with an "on click" property. A button with the name supplied will be picked up by screen readers.
- Consider adding subtitles to your scene.
Account
Login
The device where you want to login and the device where you read your email do not need to be the same device. After giving the login page your email and session name, keep it open. You can open the login email on another device and click the login link there.
Revoke login
If you clicked a login link in an email accidently you can click the revoke session link in the same email to revoke that session. You can also revoke other sessions in the project manager settings.
Persistent login
By default the "remember me" option will be checked. That means that projects are saved for offline use. If you don't want this to happen because you are on a public computer for example uncheck the "remember me" checkbox. No data will then be stored on that computer after you close the browser window.
Logout & Remove account
These can be found in the project manager settings.
Troubleshooting
Fixing rough curves
Sometimes you will notice that the curves of a polyline or polygon is divided into segments. To make these curves round again you can use the search->Fix curve subdivisions function. Select the polylines and polygons you want to alter, zoom in to the level in which you want the curves to appear round and then execute search -> Fix curve subdivisions. Zooming in too far puts unnecessary strain on performance.